Wednesday, June 27, 2012

Happy Halter: Free Pattern and Tutorial

This is part 2 of my daughter's little Disney outfit that I up-cycled the bottoms and created the top.  I love how my daughter looks in a cute v-neck and a halter is the way to go!  I mocked a top that she already has and made this quick 3 pc pattern + the skirt.
I was excited how this turned out.  I just wish my dd was a little more cooperative modeling it for me.
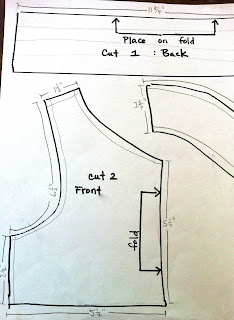
Cut 2 bodice fronts, one for interior and one for exterior.
Don't mind my chicken scratches... but use this free pattern if it is helpful to you.  This made a size 2T.


First, sew the halter straps to the bodice.  Do this to both bodice pieces.
2nd, sew the interior bodice and straps to exterior and press seams.

For the back (red polka dots) sew a few stitch lines for the elastic.  Use about 8'" of elastic for a 2T.  Put the elastic in and sew the side seam to the halter front.

Next, I clipped the fabric for the length of skirt I wanted, tore it for perfect line, finished one raw edge and then gathered along the other edge.  I sewed the skirt to the halter top and back.  Last was to sew the second side seam to finish the top.
Here is the finished product.  For my dd, it was a little baggy (she is small), so I  pinched and sewed right down the center of the halter, making a long dart.  I added a white strip of fabric for a little detail and then made a fabric flower.  I love Joy Stallard and Snazziedrawers tutorials and patterns that you can purchase.  There are tons of talented women out there and you might be inspired to follow their free tutorials on how to make fabric flowers.


Sunday, June 24, 2012

From Pants to Sweet Summer Shorts: An Up-cycling Tutorial on how to make Knickers!


These cute Gymboree pants were a find at my favorite store.  I love gingham... so I put them in my cart!
Here is the BEFORE... size 18-24 Gymboree gingham pants.
I picked a good spot to cut the sweet little pants.  Pretty much in the middle, but if you are going to transform some pants... do what suits you! 
Then I ran the cut edges through my sewing machine to make a gathered edge...
Next step is to find some fabric you like... I love polka dots!  This strip of fabric was about 29" long and about 3" wide, then I pressed it down the center.
I cut the 29" strip in half.  Then with right sides together sewed the strip to the gathered edge of the shorts... I started the strip of fabric at the inside seam... Look how cute! 
Don't stop there... add some details... I took a strip of white fabric... sewed to make a tube, then used this handy tool to turn it right side out.
Finish the edges by turning the seams inward and stitch.  I think I used about 14" to make the bow embellishments for the shorts.
Then add them to shorts.  Cute!  I love how they turned out.  Little whimsy, and a little classy... perfect for our princess!
They look great with her Minnie shoes... stay tuned for part 2... the halter top tutorial and 3 piece pattern. It's a darling halter!


Sunday, June 17, 2012

Fancy Frocks for a fun Vacation! Upcycling a Tank +1/4 yard + 1/4 yard= Dress

My children's photo won the Pillsbury's People Celebrate More Contest!  I entered the contest in the hopes of winning and taking another family on vacation that much deserved it.  What a blessing!  We leave in a few weeks and all 11 of us are heading to Walt Disney World.  In preparation, I want to make some cute clothes for the girls on the trip! That would be my daughter, Brooke, and the Uptergrove girls... Abigail, Emma, Isabella and Olivia!  Yep! 5 girls, 2 boys and 4 adults!  There is nothing that we could have purchased that would take place of the memories we will all make on this trip.  
This sweet little frock was so easy and inexpensive to make!  I purchased the tank at Target for $7.00.  I really like the neckline, and it comes in 4 different colors.  I had to buy at least one!
Polka dot sash and Minnie fabric are from Hobby Lobby.  Hobby Lobby's fabric is always 30% off of the marked price, so that is $4.89 a yard.  I purchased 1/4 of yard of each at $1.22 for a total of $2.44!  You can use a 40% off coupon instead of taking the standard 30% off, so bring your smart phone and save an extra 10% off of one cut of fabric.  That would be $1.05 for a 1/4 yard!  What a deal!  You can find cute fabrics at Hancock's too, and they will honor competitor's coupons... HL is the easiest to pull up on my iphone.  Hancock's already has Brave fabric too!

The Minnie shoes were a find at GW, and they were in Brooke's size! I  paid $2.00.  So outfit in all, a little over $10.00!  I can't wait to share the rest of their Disney Wardrobe!  Too much fun.

Saturday, June 16, 2012

Dreamy Dollhouse: Customize your Doll's house!


I have a lovely dollhouse that my dad built for me, but my daughter, Brooke, is too young to appreciate the lovely details and hand work that went into it.  This Pottery Barn Kids Dollhouse is perfect for her doll house play.  The furniture is well constructed and great for little hands.  We found the house and vacation cottage with the furniture for less than $100 on craigslist.  The Grandma's helped out with that.
So much fun for imaginative play!
I purchased these castle sets a while back for a whopping $5.99 each at Pottery Barn Kids.  Yep, they do have great sales.  Great furniture, just didn't suit a pink dollhouse and blue cottage, so I customized it.

I used Bari J. Ackerman's fabric... she is a FABULOUS fabric designer .  If you ever want to add to your fabric stash... check out her beautiful fabrics.  She inspires me!
I took the maroon fabric pieces carefully off and used spray adhesive to cover with new fabrics. Then glued the pieces back on with E6000 glue.  If you don't own a tube of this glue, you need it!  I use it to fix everything and it is great for crafting too, and you can get it anywhere!
Then for a little added detail, I painted flowers using acrylic paint, all you do is make a mark with a small paintbrush... you can do it too!

Friday, June 15, 2012

Little Details: Brooke's Sweet Baby Nursery

In a previous post, titled Sweet Surprises, I shared with you some of the details hanging from the ceiling in our darling daughter's nursery.  Here's a peak at some more of my thrifty finds that made her nursery special.
Artwork found in clearance section of HomeGoods.  I ended up painting the frame pink because it looked better with our minty walls, but this was the perfect piece to go between the two closet doors.

I painted all of the doors a pale pink which really compliments the walls.  Originally I was going to paint all of the furniture a pink, but I decided to keep them an antique white and have pink details elsewhere.

I love the Windborg Sisters Design, so colorful and sweet.  For this spot, I created my own.  The frame and glass is from GW, I used the cardboard inside as the canvas.  First I sprayed a piece of cardboard with adhesive, then wrapped it in blue fabric canvas.  Second, I painted the background with the hues that I wanted in swift strokes.  Third, paint the branches, and last I cut out the birdies and flowers with scrap fabric and scrapbook paper.  I am very pleased with how this turned out.

Found this Cinderella coach in the gardening section at Hobby Lobby and I had to have it for an accent piece.  A can of spray paint and look at what we have... a doll bed.


This dresser was a fantastic find at GW.  $40! I couldn't believe it AND the best thing was that furniture was 25% off, so it cost me a total of $30.  I primed, painted it and the beautiful pink glass knobs are from Marshalls!  Each knob was approximately $2.00 each!  The second row of drawers has a knob on it almost exactly like Anthropologie for $8.00 each!  Don't forget that Hobby Lobby has an awesome section of knobs and handles and they are 1/2 off All the Time!  I plan on painting in that oval at the bottom of the dresser, but I'll save that for another post.

Thursday, June 14, 2012

Don't Dismiss the sleeves! An Up-cycling Tutorial

It must have been passed down to me from my dad... I hate wasting things!  These little leggings/shorties were made from the sleeves of a J-Crew 3/4 sleeve top that I found at GW!  It served me well, but now has a few small holes on the front of the top.  I love the peachy red color, so I thought, I can use most of it for fabric and the sleeves are great legs for a little lady to play in.   All you need is a pair of scissors, sewing machine and some elastic!


Here is the top.  $3.00 at GW!
Just cut along the seam.
In a few of my other posts, I used leggings that I owned for a pattern.  I made my own pattern by tracing the leggings and then placed them on the sleeves.

Here you go... sew them together, sew a channel at the top for  some elastic and you have some comfy leggings or shorties, and they could last you a year or two, and they are great for play, so comfy and light!  Enjoy!

Saturday, June 9, 2012

Shirt to Shorties, another T-shirt Tutorial in 8 steps!

This t-shirt is a junior size, $1.50 at GW (red barbs were half off), so I am going to make shorties.
I always have an eye out for cute knits to up-cycle.
1. Fold the t-shirt length-wise and set your pattern.  I used an existing pair of leggings that I had for a pattern. Place the waist of the shorties along the finished edge of the T-shirt.
2. Use the existing fabric of the T-shirt to cut a wide strip.
3. Cut the wide band of fabric down the middle to have 2 strips for the ruffle.  Now, you should have 4 fabric pieces, 2 legs and 2 strips for ruffles.
4. On my machine, I can raise the thread tension and stitch length and get a simple gathered ruffle.  Gather both strips.
5. Place the gathered ruffles on the right side of the fabric, and sew along the gathering stitch.  
6. With right sides together, sew along the pant leg, and then sew the legs together...
7. Almost done, fold in the waist to make a channel for some elastic to suit your little one.
Ta-dah, too cute! Comfy and Feminine and fun for play.

Friday, June 8, 2012

Embellish your Tops... Quick Stitch makes an Impact

I love shopping for Brooke! There is an abundance of cute things out there for little ladies.  To keep up with the style and budget... I look for things to that can evolve into something new!  My goto source for supplies... GW!
Found this cute top at GW and paid $1.00 for it.  Little side tip... Target donates to GW their customer returns, damaged goods, and seasonal items.  The top I bought was new from Target, still had the tags on!
I had just enough lace to embellish the sleeves.  I purchased the lace at a Rummage sale.  I just sewed it on with a zig zag stitch.

Looks similar to one I saw for $32.00, but mine was a little over a $1.00.

She likes it, so I am happy.